How to deploy your FastAPI application on AWS Lambda with Serverless
Author: Adem Usta
Published on 2021-04-10
Introduction
FastAPI, the python package created by Sebastián Ramírez, is a great framework that allows you to create REST APIs.
It’s quite straightforward to take the control of it.
If you didn’t know this package, I wisely invite you to visit the official documentation and create your APIs with it !
If you came accross this article, you are probably looking for a way to deploy your FastAPI application on AWS Lambda, the Amazon serverless ecosystem.
Good pick ! We will try to explain to you how to proceed.
Tutorial
Step 1 - Create a simple FastAPI app
By following the official guide, we can code an application with a few lines of code.
Let’s create a file main.py that declares the app and a /hello route:
from fastapi import FastAPI

app = FastAPI(title="MyAwesomeApp")

@app.get("/hello")
def hello_world():
    return {"message": "Hello World"}
Step 2 - Test your application locally
To test the app locally, let’s create a virtual environment and install what’s inside the requirements.txt file:
fastapi==0.63.0
uvicorn==0.13.4
Some commands to do that:
python3.8 -m venv .virtualenv   # Creates a virtual environment
source .virtualenv/bin/activate # Activates it in the current shell
pip install -r requirements.txt # Installs python packages
Deploy your application locally:
uvicorn main:appYou should see some logs like these:
INFO:     Started server process [87999]
INFO:     Waiting for application startup.
INFO:     Application startup complete.
INFO:     Uvicorn running on http://127.0.0.1:8000 (Press CTRL+C to quit)
Your app is available here: http://127.0.0.1:8000.
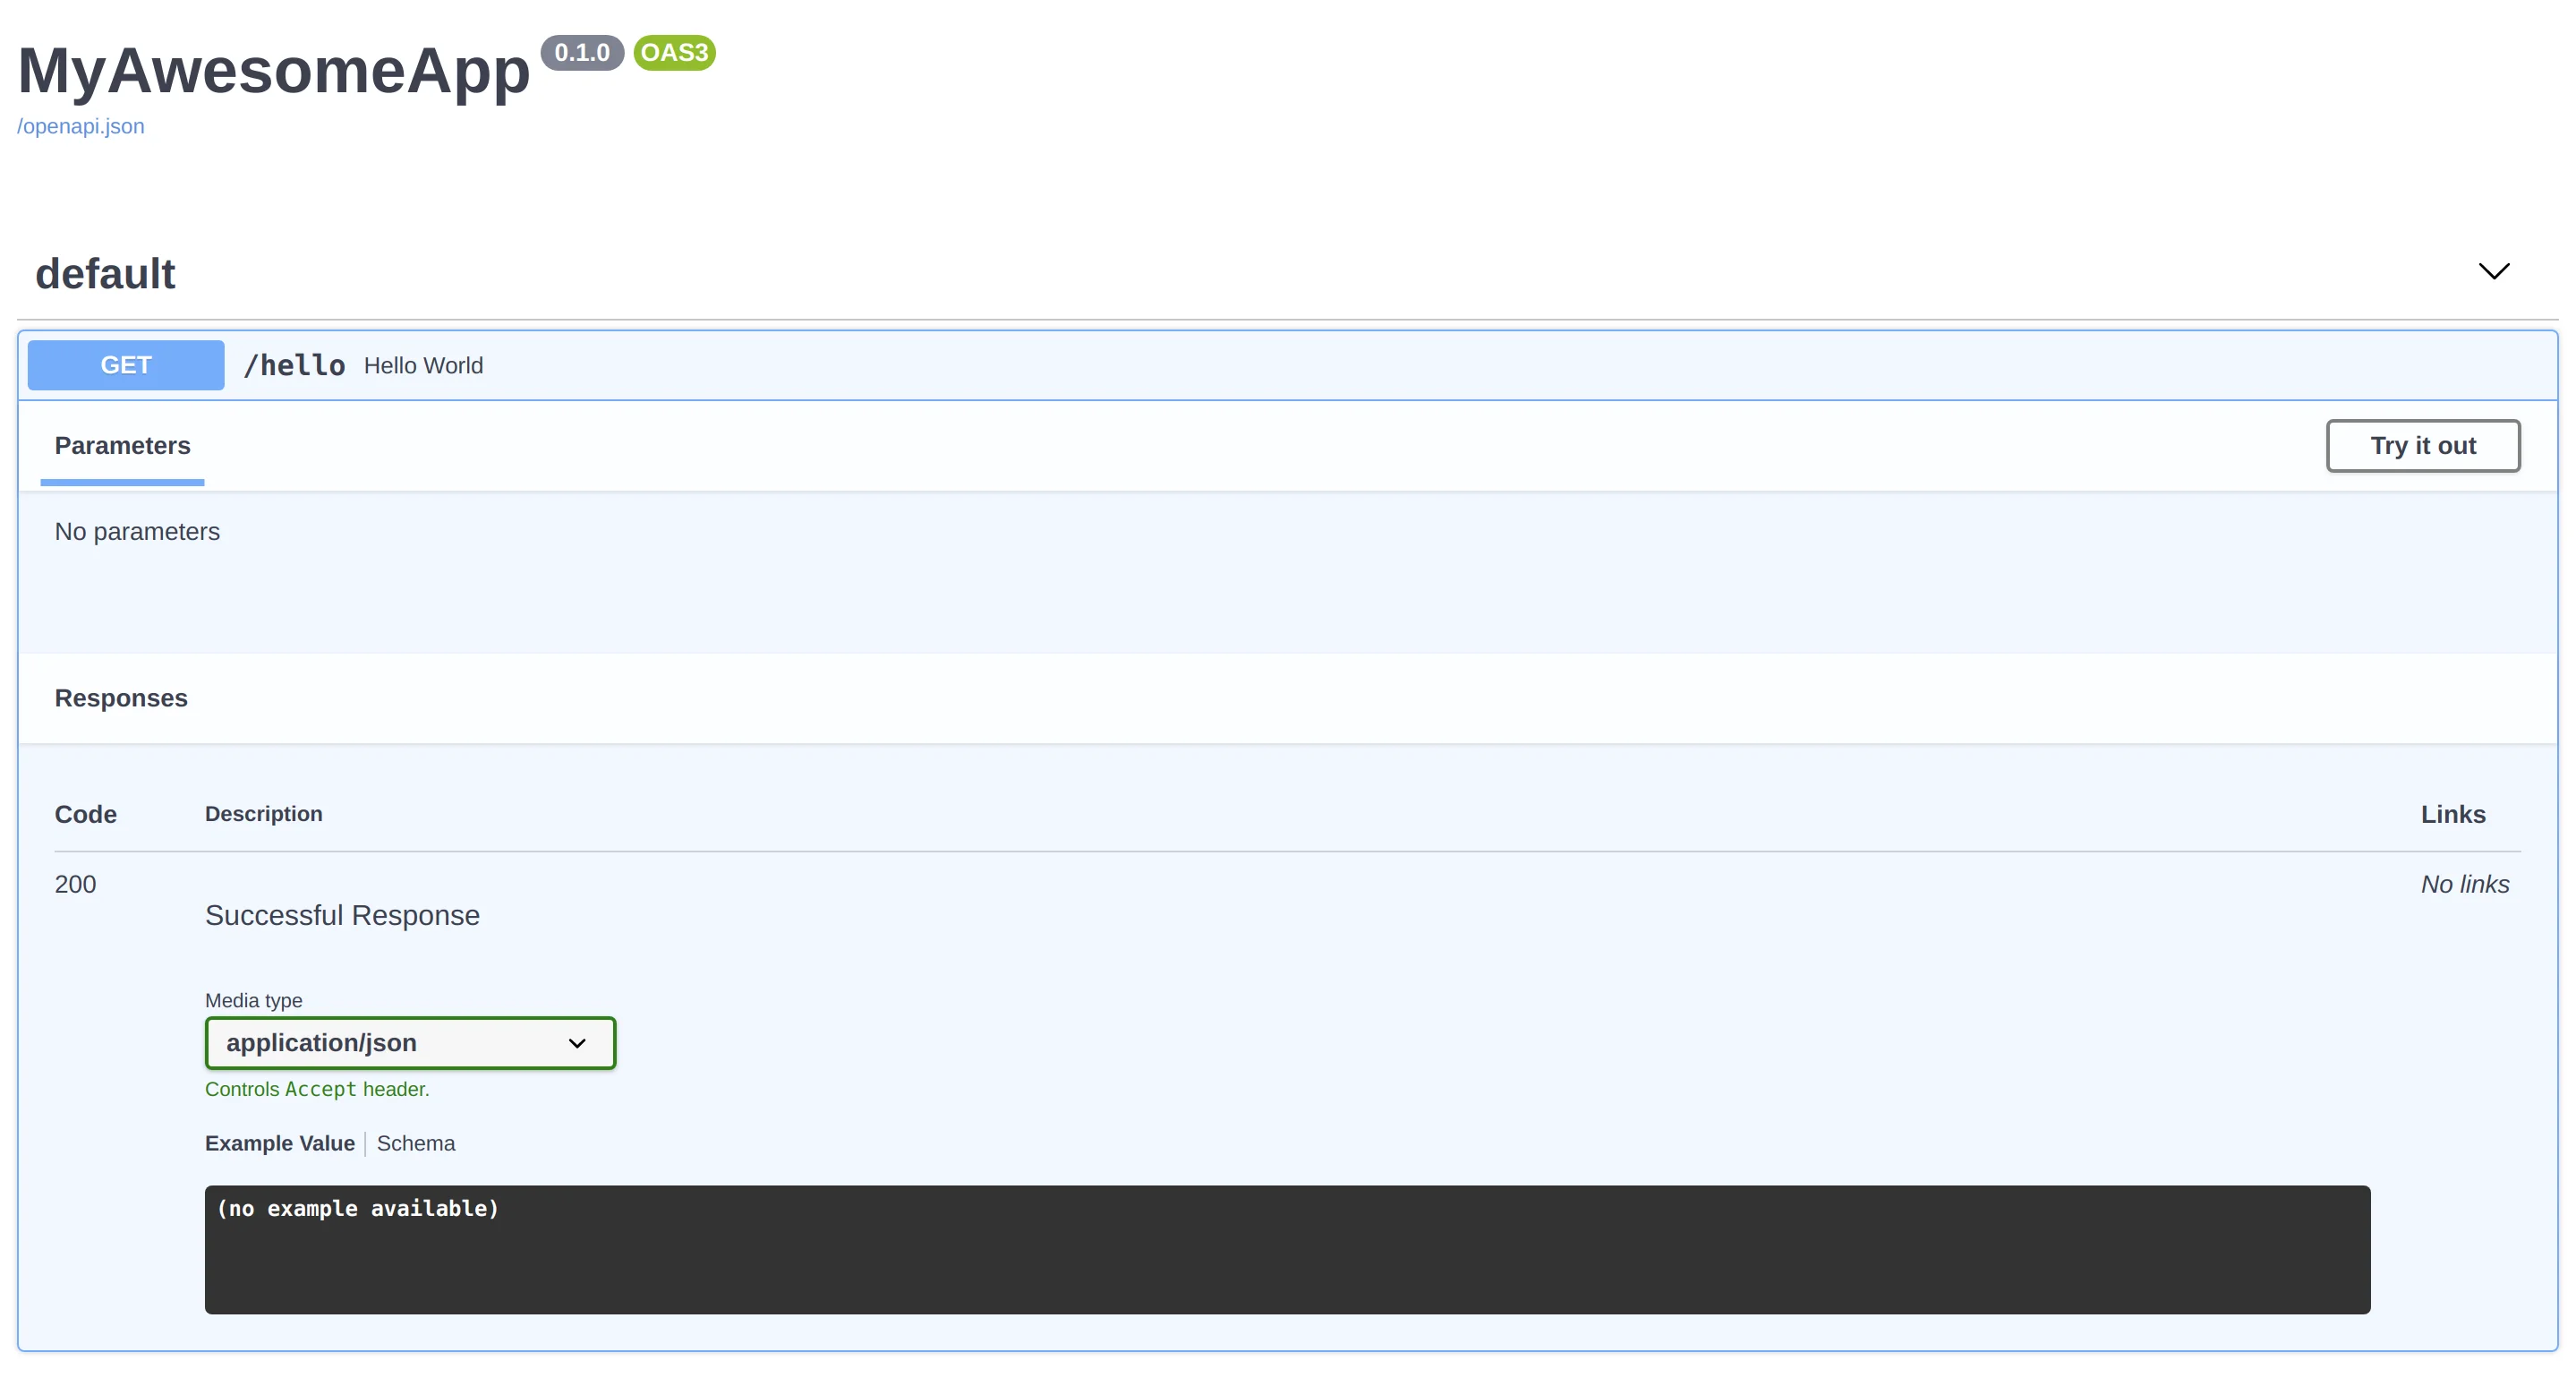
You can check the autogenerated documentation here: http://127.0.0.1:8000/docs
A small overview:
Is your app fully functionnal locally ? Perfect, we are ready for the rest.
Step 3 - Adapt your FastAPI application with the AWS Lambda ecosystem
To make your application compatible with Lambda, we will use a small package called Mangum.
Add it in your requirements.txt file, it will be essential in the next steps.
fastapi==0.63.0
uvicorn==0.13.4
mangum==0.11.0
We will modify main.py to wrap up the app object:
from fastapi import FastAPI
from mangum import Mangum

app = FastAPI(title="MyAwesomeApp")

@app.get("/hello")
def hello_world():
    return {"message": "Hello World"}

handler = Mangum(app)Note:
At this point, the app is ready and will be functionnal with Lambda, but one of the features won’t be accessible: the autogenerated documentation.
Indeed, when deployed, the application will be accessible with an endpoint that has this shape: https://XXXXXXX.execute-api.eu-west-1.amazonaws.com/stage.
Out, to generate the documentation, FastAPI needs, by default, to be served through a domain, not a path.
To solve this problem, we will modify the python code:
import os

from fastapi import FastAPI
from mangum import Mangum

stage = os.environ.get('STAGE', None)
openapi_prefix = f"/{stage}" if stage else "/"

app = FastAPI(title="MyAwesomeApp", openapi_prefix=openapi_prefix) # Here is the magic


@app.get("/hello")
def hello_world():
    return {"message": "Hello World"}


handler = Mangum(app)
In summary:
We changed the path that is used to serve openapi.json, that will allow the documentation page to be generated without any issue.
At this point, your python code is ready ! Let’s deploy that with serverless.
Step 4 - Use serverless to deploy the application
You need to install the serverless CLI and configure it with your AWS credentials.
Install the CLI with npm:
npm install -g serverlessIt’s a tool that facilitate the deployment of applications and services in the cloud, by describing them in a YAML file.
It’s compatible with AWS Lambda, and more generally with AWS Cloudformation.
For more info about this tool, go check serverless.com.
Configure serverless with your credentials:
serverless config credentials --provider aws --key <YOUR_KEY> --secret <YOUR_SECRET_KEY>Let’s create a serverless.yaml file that contains all the specifications of our app:
service: my-awesome-app

package:
  individually: true

provider:
  name: aws
  runtime: python3.8
  region: eu-west-1
  stage: ${opt:stage, "dev"}

plugins:
  - serverless-python-requirements

custom:
  pythonRequirements:
    dockerizePip: true
    layer:
      name: my-awesome-app-layer
      description: My awesome app layer
      compatibleRuntimes:
        - python3.8

functions:
  app:
    package:
      include:
        - "main.py"
      exclude:
        - "requirements.txt"
        - "package.json"
        - "package-lock.json"
        - ".serverless/**"
        - ".virtualenv/**"
        - "node_modules/**"

    handler: main.handler
    environment:
      STAGE: ${self:provider.stage}
    layers:
      - { Ref: PythonRequirementsLambdaLayer }
    events:
      - http:
          method: any
          path: /{proxy+}
And, at the same level, create a package.json file:
{
    "name": "my-awesome-app",
    "version": "1.0.0",
    "author": "<YOUR_NAME>",
    "dependencies": {
        "serverless-python-requirements": "^5.0.1"
    }
}
This file will help us install some JavaScript plugins that are used in our YAML file.
Install these plugins:
npm installAnd, let’s deploy our application !
sls deploy --stage staging # "stage" indicates which stage you are deploying. It could be anything.serverless does its magic.
After some minutes (no more than 5 usually), you will see some logs like these:
Service Information
service: my-awesome-app
stage: staging
region: eu-west-1
stack: my-awesome-app-staging
resources: 12
api keys:
  None
endpoints:
  ANY - <ENDPOINT HERE>
functions:
  app: my-awesome-app-staging-app
...
By checking these logs, you will find your application endpoint !
Here, it’s https://XXXXXXXXX.execute-api.eu-west-1.amazonaws.com/staging/ (XXXXXX is usually a mix of numbers and letters).
If you visit https://XXXXXXXXX.execute-api.eu-west-1.amazonaws.com/staging/docs, you will see your application documentation !
To update your app (e.g add a new route, etc.), you just need to modify your code, and deploy again:
sls deploy --stage stagingTo completely delete your application from the cloud:
sls remove --stage stagingYou now have all the information to create FastAPI apps and host them on AWS Lambda !
[Bonus] Step 5 - Use your own domain with your app
If you want your application to be available through your own domain, you’re a few steps from doing it !
Some prerequisites are necessary:
- a domain name hosted on AWS Route53
- a certificate linked to this domain (for HTTPS), generated with AWS Certificate Manager (if you don’t have it, create a new one and host it on the AWS default region
us-east-1, as it is considered as global for certificates).
We will use a plugin to make our life easier: serverless-domain-manager.
Install it:
npm install serverless-domain-managerAdd it in the list of plugins, in your serverless.yaml file:
plugins:
  - serverless-python-requirements
  - serverless-domain-manager
We need to configure the plugin, so add these few lines in the custom section of serverless.yaml:
custom:
  customDomain:
    domainName: YOUR_DOMAIN_HERE
    stage: ${self:provider.stage}
    certificateArn: YOUR_CERTIFICATE_ARN_HERE
    endpointType: "edge"
    securityPolicy: tls_1_2
    apiType: rest
    autoDomain: true
    autoDomainWaitFor: 120
(Don’t forget to fill the fields with your own values).
Once it’s done, deploy:
sls deploy --stage stagingAfter a few minutes, we can access to our app with our own domain !
… Really ?
Try to access to the documentation page located at /docs, you see the trap ?
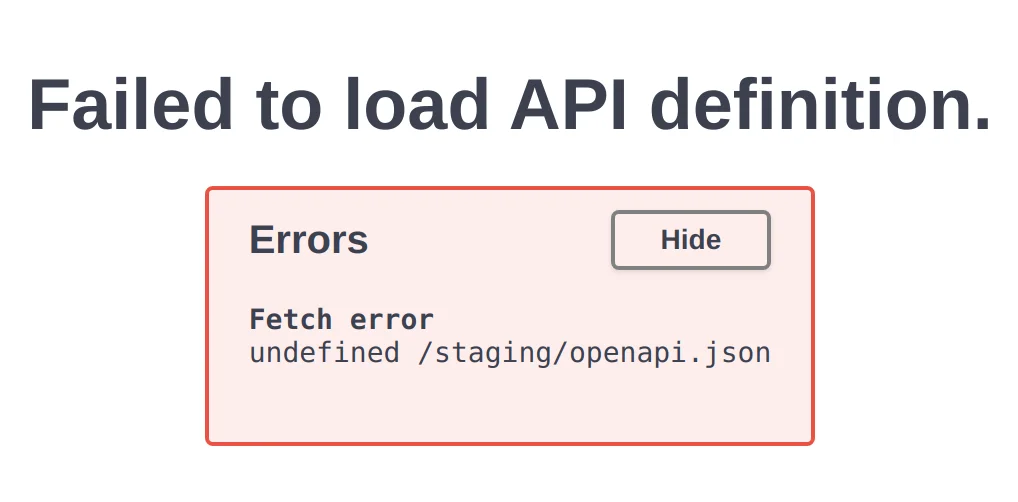
This error occurs because of what we did previously to access the documentation page with the lambda default endpoint.
We just need to rollback:
app = FastAPI(title="MyAwesomeApp", openapi_prefix=openapi_prefix) # Change this

app = FastAPI(title="MyAwesomeApp") # With this
Deploy again.

You now have your application running on AWS Lambda, with your own domain !
Conclusion
Through this article written in the form of a tutorial, you are now capable of creating a FastAPI application, test it locallly and deploy it on the cloud !
If you have any questions, feel free to contact me. Don’t hesitate !
See you soon,
Adem.